Showing posts with label demo. Show all posts

Sunday, November 21, 2010

Busy Bumblebee - Process


Gotta new documented process of my traditional paintings. It was a quick demo I did this Fall quarter at SCAD. The students have to do some sort of "manimal" (part human part animal) This is what you get when Yaritza Burgos (AKA "Bumblebee Man" from the Simpsons) gets a "Bee Movie" body and finds a job.

Prismacolor Pencil transfer to Strathmore Illustration Board. 10" x 7.5" image area. Taped off with Blue Safe Release tape.


Acrylic and Ink base colors. Watercolor was used for the clouds that I don't have a picture for.

Oil wash made with Dioxane Purple and Permanent Green Light thinned with Gamsol.

Dried oil wash removed with kneaded eraser revealing highlights and unifying shadows.

Prismacolor pencil details. and color shifts in certain areas.


Final flatbed scan color corrected with touched off with digital signature.

Details reveal lots of great texture and variations in colors.

Whole process took about 8 hours, but not all at once.


Wednesday, November 17, 2010

Before Yours and Her Very Eyes

Made this little video of one of my many painting methods. Painting was created with acrylic, watercolors, an oil wash, Prismacolor pencils, and gesso in about that order.

Video was created with iPhoto 11' slideshow. Limiting options but works OK. Real easy once you do it once right. This was my first time doing the slideshow.

Big Eyes Surprise

Thursday, February 25, 2010

New Process video!

Just created this process video for my Materials and Techniques II class at SCAD. Enjoy!


Skater Dude

Tuesday, February 9, 2010

Aqua Teen Hunger Force background!

After working on 6 movie backgrounds for Cartoon Network's "Aqua Teen Hunger Force colon Movie Film for Theaters" (yes, this is the full title exactly). They called on my pixel pushing skills again for the TV show. Just this past Sunday the new episode of the Adult Swim TV show Aqua Teen Hunger Force "Rabbot Redux" aired and it had about 2 min of air time using a background I did! Took about 2-3 weeks to do back in December
2009. A bit about the creation process.

1. This is what the Art Director, Bob Pettitt, sent me as a starting point. This was used as a "holder" for the animation build of the scene. After talking with me about the scenes needs and he sending me a few texture files, food items for the salad bar I got started.


2. I established eye an level horizon line using one point perspective. Then I created most of the base mechanical/architectural shapes in Illustrator CS4 then by copying and pasting into Photoshop CS4 I created several smart object layers.


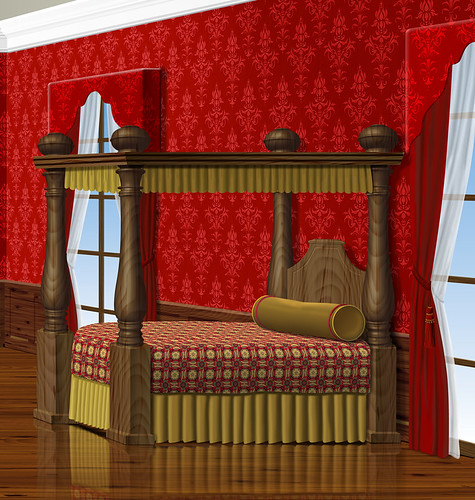
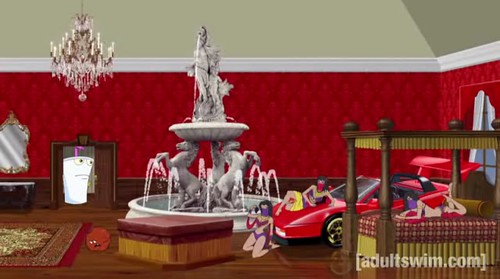
3. I sent progress to the AD a couple of times. I did not do the Ferrari. They already that done, I just had to make sure the perspective matched the rest and fit in between the bed and fountain. I had to make sure that the layers of objects were set up in such a way that the characters could go behind all the elements. So each object was on it's own layer with transparent backgrounds.


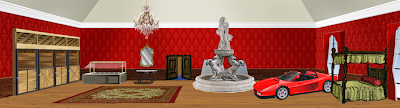
4. After creating in smart objects in Photoshop, I used them as clipping masks to add textures mainly. On some smart object layers I added shadows and highlights as clipping masks. This is the final background low res version. The original is 12000 x 3240 pixels (40in x 10.8in at 300 dpi) with 411 layers! High Def Baby!

Meatwad's Luxury Room

Some details - indoor horse stable!
Stable Detail


fancy luxury bed! I used the Vanishing Point filter and the Liquify filter to apply the bed spread pattern.
Bed Detail


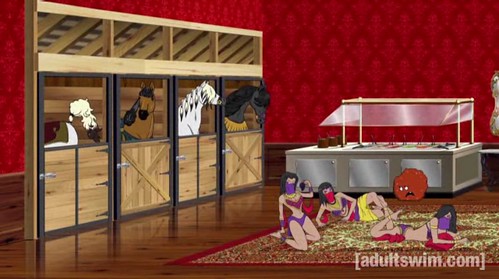
Some screen shots of how they used them in the end. It was about 2 min of airtime. Pretty funny little scene.

Water Fountain, Lamborgini and Bed


Horse Stable, Salad Bar and Sexy Ladies

If you want to see the whole episode you can go to this direct link on the Adult Swim website, but I must warn you that it's NSFW, but not R rated. It's not the type of crude humor that everyone can appreciate. (If there is such a humor.) It's only a 15 min show, but to skip right to the scene go to the end of the first video clip and the next clip will load and it's toward the beginning of that video file.


Saturday, June 6, 2009

Spiritual Connections

It's been a while since I was an official student of the arts. Since 2000 I have been a teacher of the arts. Well I started the journey of getting my MFA so that I could have the opportunity to teach full-time at a college level. The logical and most practical choice was to get my MFA from the place I teach, SCAD-Atlanta. I could teach and take classes at the same time all in the same place. Well this past quarter I did just that. I taught 2 classes (Getting Published, and Self Promotion for Illustrators) and took my first class with Illustration professor Julie Mueller-Brown. It was grueling financially, physically, and mentally! During the middle of the quarter I found a more flexible and faster way to get my MFA at Hartford Art School, Limited Residency MFA in Illustration. So I won't be continuing with SCAD for my MFA in Illustration. More on that later.

ILLU 714 Drawing for Illustrators was a great course to start off with and therapeutic in many ways. For the first time in a long time I had allotted time to draw for me. Well, I was drawing for my professor but it was much more wide open than any other paying freelance gig I have done in over 16 years. The 7 other students and I did TONS of drawing inside and outside of class. Part of it was to create 5 personal graphite drawings outside of class. Julie wanted us to just start scribbling on nice drawing paper and see what happened. Below is my journey of those drawings. She is going to use my series of drawings as an example of the process for when she gives this assignment again. I went from literal symbols and words to almost abstract expressionism. Very different from what I am used to and a breath of fresh air.


I would love to get any feedback on these good or bad.

Wednesday, May 28, 2008

My process

Here is a demo I did for my Electronic Illustration class. The link to the web page not only describes my process of painting and modifying the same Photoshop image for 3 different looks of the same image. The web page itself was an actual assignment as well. The style was something really different for me and I had lots of fun illustrating it. Let me know what you think.

The Devil Painting Process

The students created 3 different tarot cards of their choice in a style of their choice using Photoshop and Painter and then they created a web page based on those cards talking about their process. They all worked very hard on these and a great job overall. Here are some links to the students web pages.

Mary Wall
Matt Kelly
Sarah Pettis
Fiona Handshin
Min Choi
Tanya Rodes-Colee
Alan Hawley
Jacob Smith

...more student links to come soon.